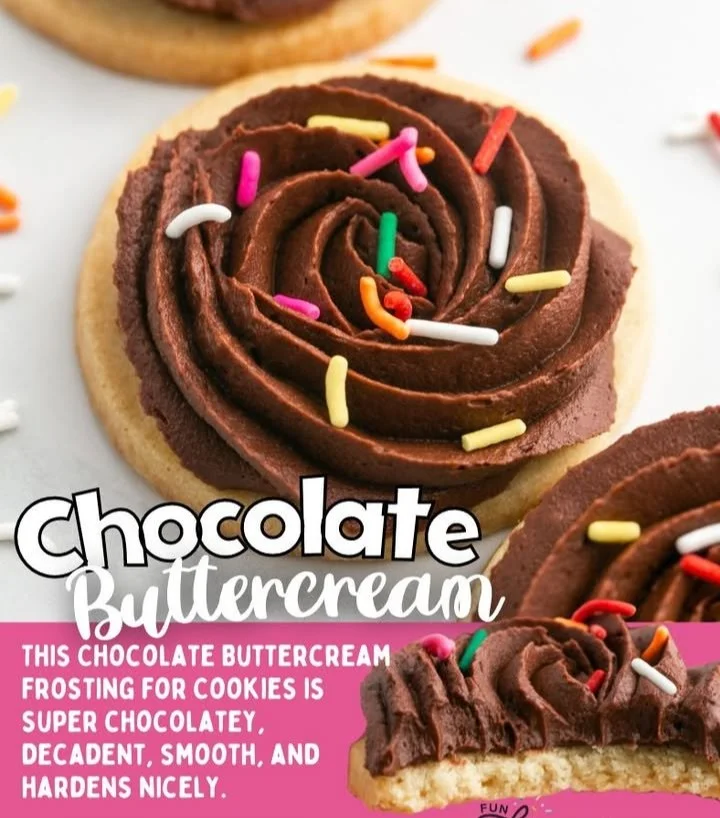
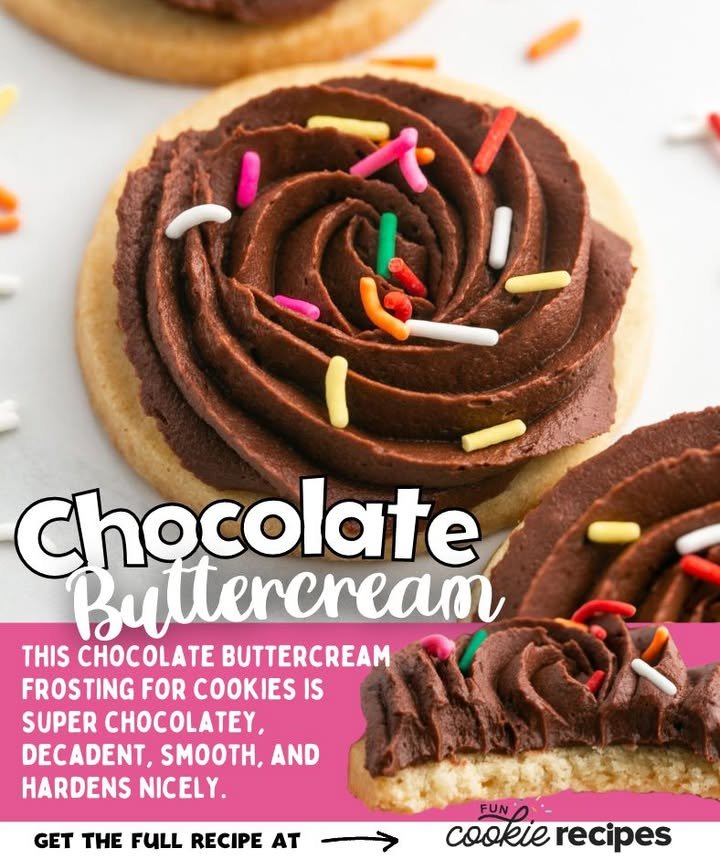
Chocolate Buttercream Frosting
Chocolate Buttercream Frosting is a staple in any baker’s repertoire, perfect for adding that irresistible touch to cakes, cookies, and cupcakes. I remember the first time I whipped up this decadent frosting—it instantly transformed a simple chocolate cake into a masterpiece! Its creamy texture and rich cocoa flavor make it an indulgent addition to any dessert, whether you’re celebrating a birthday or simply treating yourself after a long week.
Why you’ll love this dish
When it comes to comfort food, this Chocolate Buttercream Frosting stands out. It’s incredibly versatile, making it ideal for various occasions, from casual weeknight desserts to festive holiday treats. What makes it even better? It’s surprisingly easy and quick to make, allowing you to whip up a batch even on your busiest days.
“This frosting is pure magic! It’s rich, fluffy, and just sweet enough. I can’t imagine a birthday without it!” – A happy home baker.
Step-by-step overview
Creating your own Chocolate Buttercream Frosting is a fun and rewarding process that requires just a few simple steps. First, expect a delightful blend of creamy butter mixed with sweet powdered sugar and rich cocoa. With each addition, the textures meld beautifully, leading to a luscious finish. By the end of the process, you’ll have a smooth, spreadable frosting that elevates any dessert to the next level!
What you’ll need
To whip up this heavenly frosting, gather the following ingredients:
- 1 cup unsalted butter, softened
- 3-4 cups powdered sugar (adjust for desired sweetness)
- 1/2 cup unsweetened cocoa powder
- 1/4 cup milk (whole or any preferred type)
- 1 teaspoon vanilla extract
If you’re in a pinch, feel free to substitute the unsalted butter with margarine for a dairy-free option, or use a sugar alternative in place of powdered sugar if dietary needs demand.
Step-by-step instructions
- In a large mixing bowl, beat the softened butter until it becomes creamy and fluffy.
- Gradually add the powdered sugar and cocoa powder, mixing until well combined.
- Pour in the milk and add the vanilla extract, continuing to beat until the frosting reaches a smooth, spreadable consistency.
- If the frosting is too thick, adjust by adding more milk; if it’s too thin, incorporate additional powdered sugar little by little.
- Finally, spread or pipe the frosting generously over your cooled cookies or cakes.
Best ways to enjoy it
This Chocolate Buttercream Frosting isn’t just for cakes! Consider using it as a topping for brownies, dipping fresh fruits like strawberries or bananas, or even swirling it into cupcake centers for a hidden surprise. For an elevated presentation, pipe it into beautiful designs atop your desserts, or use it as part of a decadent dessert platter alongside coffee or tea.
How to store
To keep your frosting fresh, store it in an airtight container in the refrigerator for up to a week. If you have any leftovers, this frosting also freezes beautifully! Simply place it in a freezer-safe container, and it will last for up to three months. Make sure to label it with the date! When you’re ready to use it again, let it thaw in the fridge overnight before re-whipping for a few seconds to restore its texture.
Helpful cooking tips
To achieve that perfect, airy frosting, ensure your butter is at room temperature before starting. This makes it easier to incorporate air, resulting in a fluffier finish. And if you prefer a lighter chocolate flavor, reduce the cocoa powder slightly while increasing the powdered sugar. A pinch of salt can also enhance the chocolate flavor, balancing the sweetness!
Creative twists
Why not get creative with your Chocolate Buttercream Frosting? Consider incorporating flavors like peppermint extract for a holiday twist or adding a splash of espresso for a mocha flavor. You could also experiment with different types of chocolates—dark, milk, or even white! For a fun texture, fold in mini chocolate chips or crushed cookies just before spreading.
FAQs
How long does it take to make this frosting?
Making Chocolate Buttercream Frosting is quick—a total of about 15-20 minutes from start to finish!
Can I substitute margarine for butter?
Yes, margarine works in a pinch and can be used for a dairy-free option, though it may slightly alter the flavor.
How do I adjust the sweetness?
Simply tweak the amount of powdered sugar; start with 3 cups, taste, and add more if desired until you reach your preferred sweetness!
With this simple recipe in your arsenal, you can elevate every dessert you make. Enjoy the process and the delicious results!

Chocolate Buttercream Frosting
Ingredients
Method
- In a large mixing bowl, beat the softened butter until it becomes creamy and fluffy.
- Gradually add the powdered sugar and cocoa powder, mixing until well combined.
- Pour in the milk and add the vanilla extract, continuing to beat until the frosting reaches a smooth, spreadable consistency.
- If the frosting is too thick, adjust by adding more milk; if it’s too thin, incorporate additional powdered sugar little by little.
- Spread or pipe the frosting generously over your cooled cookies or cakes.