
It’s quiet here in my kitchen, a small sanctuary nestled in the heart of Chicago, where the scent of vanilla and cocoa dances in the air. As I pull a red velvet cake from the oven, a warm wave of nostalgia washes over me. This Gluten-Free Red Velvet Cake holds a special place in my heart, evoking memories of family gatherings and laughter echoing through our home. I remember the first time I decided to make a gluten-free version, thinking about my dear friend who had recently discovered she couldn’t enjoy gluten without consequence. I wanted her to experience the joy of cake without missing out, and that spark ignited my passion for crafting this lush, velvety treat, making it safe for her to indulge.
Now, I find myself lost in the rich crimson of the batter, marveling at how a simple blend of ingredients can create something so beautiful and delicious. Every swirl is a reminder that cooking is not just about the food—it’s about the connections we make and the memories we create around the table. Join me on this journey as we explore the magic of Gluten-Free Red Velvet Cake together.
Flavor and Popularity
The Unique Flavor Profile of Gluten-Free Red Velvet Cake
One of the most alluring aspects of Gluten-Free Red Velvet Cake is its extraordinary flavor profile. The combination of cocoa powder, a hint of vanilla, and the subtle tang from buttermilk creates a symphony of tastes that dances on your palate. Unlike many cakes that might overpower your senses, this cake finds a delicate balance. The earthiness of the cocoa powder harmonizes beautifully with the rich, buttery undertones, giving you a slice that is both indulgent and uplifting.
What sets red velvet apart from other cakes is the addition of a touch of vinegar, which pairs with the richness of the buttermilk to produce a tender crumb that melts in your mouth. This cake isn’t just visually stunning; it also elevates any celebratory occasion—from birthdays to anniversary dinners. The cream cheese frosting, sweet yet tangy, complements the cake’s flavor, creating a delightful contrast that has captivated dessert-lovers worldwide.
Why This Recipe Is a Family Favorite and Crowd-Pleaser
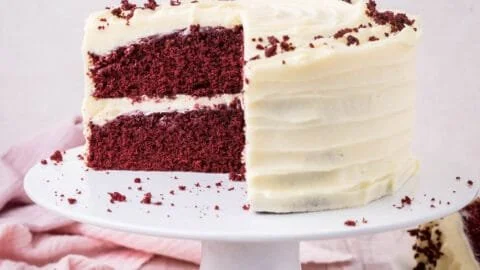
This recipe transcends being merely a cake; it embodies tradition and love. Gluten-Free Red Velvet Cake has quickly become a cherished favorite in my circle. The bright red hue is irresistibly inviting, instantly drawing guests in as soon as it’s unveiled—their eyes light up with anticipation. It’s more than just a sweet treat; it’s a centerpiece that starts conversations and elicits smiles.
Especially during the holidays, my friends and family eagerly anticipate my rendition of this classic dessert. There’s a delightful collective gasp as the cake is sliced, revealing its vibrant layers. The flavors mingle to create harmony, and I can see their hearts happy and their taste buds dancing. It’s become a tradition to gather around this cake, celebrating togetherness as much as the flavors, creating shared memories that will last a lifetime.
Ingredients and Preparation
Essential Ingredients and Possible Substitutions
To create a delicious Gluten-Free Red Velvet Cake, you’ll need a handful of key ingredients. Don’t fret if you can’t find something; there are versatile substitutions available.
Gluten-Free All-Purpose Flour: This is the star of our recipe. It’s best to choose a blend that includes xanthan gum to help provide structure. If you don’t have it, consider almond flour or coconut flour, though they will alter the texture slightly.
Cocoa Powder: Use high-quality unsweetened cocoa powder for a rich chocolate flavor. If you’re looking for a healthier alternative, consider raw cacao powder.
Sugar: Granulated sugar keeps the cake moist and sweet. Coconut sugar or even maple syrup can substitute, but you’ll need to adjust the liquid ingredients in your recipe.
Buttermilk: This adds tenderness and a slight tang that’s crucial for the authentic flavor. If you’re without buttermilk, mixing plain yogurt with milk or a dairy-free alternative will work perfectly.
Eggs: These provide moisture and act as a binder. For an egg-free version, you could substitute with flaxseed meal mixed with water or unsweetened applesauce.
Butter: The richness of unsalted butter provides depth. If you need a dairy-free option, coconut oil or dairy-free butter will do well.
Cream Cheese Frosting: The luxurious topping is made from cream cheese, butter, powdered sugar, and vanilla. For a lighter version, try Greek yogurt or a vegan cream cheese alternative.
Step-by-Step Recipe Instructions with Tips
Creating the perfect Gluten-Free Red Velvet Cake is simpler than you might think. Here’s a step-by-step guide to ensure your cake comes out flawless every time:
Preheat your oven to 350°F (175°C). Prepare your 9-inch round cake pans by greasing them and lining the bottom with parchment paper for easy removal.
Mix dry ingredients: In a large bowl, sift together 2 cups of gluten-free all-purpose flour, 1 cup of granulated sugar, 1 tablespoon of cocoa powder, 1 teaspoon of baking soda, and 1 teaspoon of salt. This ensures even distribution of flavors and leavening.
Combine wet ingredients: In another bowl, whisk together 1 cup of buttermilk, 1 cup of vegetable oil (or melted coconut oil), 2 large eggs, 1 teaspoon of vanilla extract, and 1 teaspoon of white vinegar. The vinegar activates the baking soda, contributing to the cake’s lift.
Blend the mixtures: Gently fold the wet ingredients into the dry ingredients until just combined. Be careful not to over-mix to keep the batter light and fluffy.
Add the red color: Incorporate 2 tablespoons of red food coloring. You can use natural alternatives like beet juice if desired, though it may change the flavor slightly.
Pour the batter into the prepared pans, dividing evenly. Bake in the preheated oven for about 25 to 30 minutes or until a toothpick inserted into the center comes out clean.
Cool down: Let the cakes cool in their pans for 10 minutes, then flip them onto a wire rack to cool completely. Patience is key!
Frosting time: For the cream cheese frosting, beat together 8 oz. of softened cream cheese and ½ cup of unsalted butter until creamy. Gradually mix in 3 cups of powdered sugar and 1 teaspoon of vanilla extract until well combined and fluffy.
Assemble your cake: Once the layers are cooled, place one layer on a cake plate, spread a generous amount of frosting, and then carefully place the second layer on top. Frost the top and sides as desired.
Decorate: Add a sprinkle of cocoa powder or edible flowers for a lovely finish.
Cooking Techniques and Tips
How to Cook Gluten-Free Red Velvet Cake Perfectly
Cooking gluten-free can be tricky, but with a few tricks up your sleeve, you can excel. An essential tip is to ensure your ingredients are at room temperature to create a smooth batter without clumps. When baking, always measure your ingredients accurately. This precision is vital for achieving the right texture and flavor profile.
Another trick is to avoid opening the oven door too early, as this may cause the cake to sink. Give your cake the necessary time to rise and set. Once it’s out, let it cool completely before frosting. If you’re in a hurry, you can speed up this process by placing the cakes in the fridge for about 30 minutes.
Common Mistakes to Avoid
A few common pitfalls can lead to a less-than-perfect Gluten-Free Red Velvet Cake. Be wary of overmixing the batter; this can result in a dense cake. Additionally, ensure your leavening agents are fresh. Old baking powder or baking soda may inhibit the rise of your cake.
Another crucial aspect is not allowing the cake to cool long enough before frosting. If the cake is still warm, the frosting will melt and slide right off, leading to a cake disaster. Finally, don’t skimp on the quality of your ingredients. Using fresh, high-quality elements makes the difference between a good cake and a great one.
Health Benefits and Serving Suggestions
Nutritional Value of Gluten-Free Red Velvet Cake
While indulgent, Gluten-Free Red Velvet Cake can have beneficial elements. By using gluten-free flours that often contain fibers, such as almond flour, you boost the nutritional profile. This cake can also incorporate healthy fats if you opt for coconut oil instead of butter, alongside options such as Greek yogurt for a lighter frosting.
Moreover, you can add a sprinkling of nuts or chia seeds to enhance the texture and nutrition further. Everyone deserves a sweet treat now and then, and with thoughtful modifications, you can enjoy balance and delight in every bite.
Best Ways to Serve and Pair This Dish
This cake shines not only on its own but also when paired with accompaniments that enhance its flavors. Consider serving it with a dollop of whipped cream or a scoop of vanilla ice cream on the side. Fresh berries like raspberries or strawberries add a tartness that beautifully contrasts with the sweetness of the cake.
For beverages, pair it with a rich coffee or a glass of sparkling water with a splash of lime, refreshing and awakening your taste buds. Whether for a cozy family gathering or a grand celebration, this Gluten-Free Red Velvet Cake will command attention on any dessert table.
FAQ Section
Can I use a different type of flour for Gluten-Free Red Velvet Cake?
Yes, you can! While gluten-free all-purpose flour works great, almond flour or oat flour may also be used, though the texture and moisture level might vary slightly. Experimenting can lead to delightful variations.
How can I make the cake vegan?
To make a vegan version, substitute eggs with flaxseed meal mixed with water, use plant-based buttermilk (almond or soy milk with lemon juice), and replace butter with coconut oil or vegan butter.
Can I prepare the cake in advance?
Absolutely! You can bake the cake layers ahead of time and store them in the refrigerator for up to a week, or freeze them for up to three months. Just make sure they are wrapped tightly to prevent freezer burn.
How should I store leftover Gluten-Free Red Velvet Cake?
Store any leftover cake in an airtight container in the refrigerator. It can last for up to five days, though it’s best served fresh! For longer storage, freeze individual slices in airtight bags.
As my knife glides through the velvety red layers of this cake and I pause to savor the moment, I think of the hearts I hope to bring together through my Gluten-Free Red Velvet Cake. Each bite is a warm hug, a delicious reminder that food connects us all. If you’re like me, you’ll find joy not only in baking this cake but also in sharing it—creating sweet memories that linger long after the cake is gone. So roll up your sleeves, and let’s transform ordinary moments into something extraordinary. Trust me, you’ll want to make this again and again.
Gluten-Free Red Velvet Cake
Ingredients
Dry Ingredients
- 2 cups gluten-free all-purpose flour Choose a blend with xanthan gum if possible.
- 1 cup granulated sugar Can substitute with coconut sugar or maple syrup.
- 1 tablespoon cocoa powder Use high-quality unsweetened cocoa powder.
- 1 teaspoon baking soda
- 1 teaspoon salt
Wet Ingredients
- 1 cup buttermilk Can substitute with yogurt mixed with milk.
- 1 cup vegetable oil Or melted coconut oil.
- 2 large eggs For egg-free, substitute with flaxseed meal mixed with water.
- 1 teaspoon vanilla extract
- 1 teaspoon white vinegar Activates the baking soda.
- 2 tablespoons red food coloring Natural alternatives like beet juice can be used.
Frosting Ingredients
- 8 oz cream cheese Softened.
- ½ cup unsalted butter Softened.
- 3 cups powdered sugar
- 1 teaspoon vanilla extract
Instructions
Preparation
- Preheat your oven to 350°F (175°C). Prepare your 9-inch round cake pans by greasing them and lining the bottom with parchment paper.
- In a large bowl, sift together the dry ingredients: gluten-free all-purpose flour, granulated sugar, cocoa powder, baking soda, and salt.
- In another bowl, whisk together the wet ingredients: buttermilk, vegetable oil, eggs, vanilla extract, and white vinegar.
- Gently fold the wet ingredients into the dry ingredients until just combined.
- Incorporate the red food coloring into the batter.
Baking
- Pour the batter evenly into the prepared pans and bake for about 25 to 30 minutes or until a toothpick inserted into the center comes out clean.
- Let the cakes cool in their pans for 10 minutes, then flip them onto a wire rack to cool completely.
Frosting and Assembly
- For the frosting, beat together the cream cheese and unsalted butter until creamy, then gradually mix in the powdered sugar and vanilla extract until fluffy.
- Once the layers are cooled, place one layer on a cake plate, spread a generous amount of frosting on top, and then place the second layer on top.
- Frost the top and sides as desired and decorate with cocoa powder or edible flowers.
