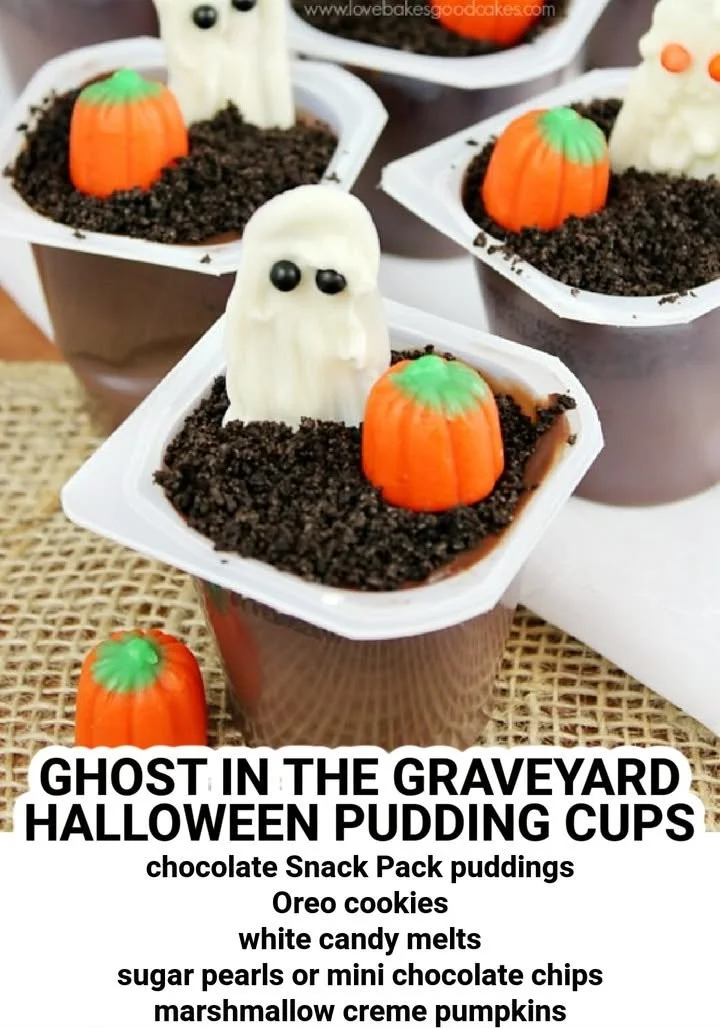
Growing up, Halloween was always my favorite time of year. The air felt electric with a kind of magic that made the world sparkle just a little more brightly. I can vividly remember the first time I made Ghost in the Graveyard Halloween Pudding Cups. It was a last-minute decision; a whim inspired by a sudden urge to bring an extra touch of festivity to our annual haunted gathering. The idea of those spooky little “ghosts” peeking out from the creamy, decadent pudding brought an immense sense of joy, palpable even in my small Chicago kitchen.
I gathered my supplies, listening to the wind rustling the crisp autumn leaves outside. As I poured the pudding mix into the bowls, I could almost hear the whisper of the Halloween spirits, urging me to create something memorable. Each layer became an expression of creativity—smooth chocolate pudding as the grave, vanilla whipped cream as the ghostly figures, and a sprinkle of crushed Oreos for that extra crunch, representing the haunted earth. When I finally set them out, the delight in my friends’ eyes was worth every minute spent in preparation. “These are so cute!” someone exclaimed, and I felt a warm glow of pride. That magical evening set the stage for my lifelong journey into cooking and sparked a passion for making food that not only tastes incredible but also charms and delights.
Flavor and Popularity
The Unique Flavor Profile of Ghost in the Graveyard Halloween Pudding Cups
Ghost in the Graveyard Halloween Pudding Cups deliver a delightful combination of flavors that transports you straight into the spirit of the season. The velvety chocolate pudding serves as the perfect base, offering a rich, indulgent taste that’s hard to resist. The ghostly vanilla topping provides a light, fluffy contrast, balancing the deep richness of the chocolate.
Furthermore, the addition of crushed Oreos gives these dessert cups an earthy crunch, illustrating the "graveyard" theme with every bite. Each element harmonizes beautifully, creating an experience that’s both playful and satisfying. In terms of flavor, think of a hauntingly delicious combination of chocolate, vanilla, and just a hint of nostalgia that will remind you of childhood treats. It’s not just about filling your stomach; it’s about creating memories—both culinary and emotional.
Why This Recipe Is a Family Favorite and Crowd-Pleaser
What makes these pudding cups a family favorite, besides their spooky appeal, is their simplicity. The recipe requires straightforward ingredients, which you probably already have in your pantry. This makes it an excellent option for spontaneous gatherings or to involve children in the kitchen, introducing them to the joy of cooking.
Additionally, the customizable nature of these cups lends them to being a crowd-pleaser. Want to switch the chocolate pudding for pumpkin spice? Go for it! Feel like adding gummy worms for an even creepier look? Yes, please! Whether it’s for a kid’s party or an adult Halloween gathering, these pudding cups adapt well to varying tastes and dietary preferences, making them a universal hit.
Ingredients and Preparation
Essential Ingredients and Possible Substitutions
To create the perfect Ghost in the Graveyard Halloween Pudding Cups, you’ll need just a handful of ingredients, which keeps things accessible and uncomplicated:
- Chocolate Pudding Mix: You can opt for store-bought pudding or homemade. For a twist, consider using chocolate avocado pudding for a healthier version.
- Milk: Whole milk will yield creamier pudding, but you can substitute with almond milk or soy milk for dairy-free options.
- Heavy Whipping Cream: This is essential for creating the fluffy ghosts. You can also use whipped topping as a time-saver.
- Crushed Oreos: These provide the perfect "grave dirt." If you want a gluten-free alternative, use crushed gluten-free cookies.
- Gummy Candies or Halloween Sprinkles: These are optional but make for great decorations.
Step-by-Step Recipe Instructions with Tips
Prepare the Chocolate Pudding:
In a medium bowl, whisk together the chocolate pudding mix and milk until combined and thick. Chill in the fridge for about 5 minutes while you prepare the whipped cream.Whip the Cream:
In a separate bowl, beat the heavy whipping cream until soft peaks form. Add a tablespoon of sugar if you prefer it sweeter and continue whipping until stiff peaks form.Layer the Cups:
Start with a layer of chocolate pudding at the bottom of clear plastic cups or small mason jars. Then, add a layer of crushed Oreos to resemble grave dirt.Create the Ghosts:
Using a piping bag or spoon, top with whipped cream to create ghostly shapes. Finish off with a couple of chocolate chips as the eyes. For extra fun, you can add gummy worms or edible eyes on the whipped cream.Chill and Serve:
Place the pudding cups back in the refrigerator for at least 30 minutes before serving. This allows the flavors to meld beautifully.
Tips:
- Working with children? Let them design their own spooky faces on the ghost layer.
- If you find your whipped cream is too soft, chill your mixing bowl and beaters before whipping for a firmer result.
Cooking Techniques and Tips
How to Cook Ghost in the Graveyard Halloween Pudding Cups Perfectly
Making these pudding cups involves simple, straightforward techniques that yield impressive results. One of the key elements is ensuring your pudding achieves the right consistency. Mixing the pudding until it’s thick and lump-free is crucial—this guarantees a smooth texture.
When whipping your cream, make sure everything is cold; the bowl, cream, and beaters. This will help achieve peaks that are light and airy, creating the perfect fluffy “ghosts” sitting atop your graveyard.
Common Mistakes to Avoid
One common mistake is rushing the chilling time. Allow the pudding and whipped cream to set properly in the refrigerator. If served too warm, the cups might not maintain their desired layered look. Additionally, over-whipping the cream can lead to a grainy texture, so be sure to stop when you see soft to stiff peaks.
Health Benefits and Serving Suggestions
Nutritional Value of Ghost in the Graveyard Halloween Pudding Cups
While these dessert cups are indulgent, they don’t have to be completely off-limits. Using low-fat ingredients or even plant-based alternatives can lower calorie counts without sacrificing flavor. For example, avocado-based pudding provides healthy fats while maintaining a sweet profile.
Each cup also incorporates dairy, which can provide a good source of calcium. Just remember to enjoy in moderation, as these are still treats at heart!
Best Ways to Serve and Pair This Dish
Serving these pudding cups in clear cups allows you to highlight the layers, drawing attention to both aesthetic appeal and deliciousness. They shine at Halloween parties, alongside savory dishes or as part of a festive dessert table. You can also accompany them with seasonal fruits like clementines or pomegranates, or serve them with a side of freshly baked cookies for kids to dip.
If you’re looking to impress adults, pair this dessert with coffee or spiced cider for an elevated experience.
FAQ Section
Can I make Ghost in the Graveyard Halloween Pudding Cups ahead of time?
Absolutely! These pudding cups can be made a day in advance. Just keep them covered in the fridge, and add any toppings just before serving for the best presentation.
What can I use instead of Oreos for a gluten-free version?
You can easily substitute with gluten-free chocolate cookies or crushed graham crackers. Both options provide a delightful texture you can enjoy without gluten.
Can I make a healthier version of this recipe?
Certainly! You can use sugar-free pudding mix, low-fat milk, and substitute the heavy cream with whipped coconut cream for a lighter version that still satisfies your sweet tooth.
How can I personalize these pudding cups for different holidays?
This recipe is incredibly customizable! For Christmas, use peppermint-flavored pudding and crushed candy canes, or for Easter, switch to pastel-colored whipped cream and mini chocolate eggs.
As you embark on making these delightful Ghost in the Graveyard Halloween Pudding Cups, I hope you find yourself wrapped in the warmth of nostalgia, creativity, and perhaps a few giggles as you layer those spooky cups. If you’re like me, you’ll enjoy letting your imagination run wild with them. There’s something comforting about creating food that brings joy to others, especially when it embraces the whimsy of Halloween. Trust me, you’ll want to make this treat again and again, not just for the holiday, but to keep the spirit of fun alive throughout the year!

Ghost in the Graveyard Halloween Pudding Cups
Ingredients
For the pudding
- 1 box Chocolate Pudding Mix You can opt for store-bought or homemade; consider using chocolate avocado pudding for a healthier version.
- 2 cups Milk Whole milk gives creamier pudding; alternatives include almond milk or soy milk for dairy-free options.
For the topping
- 1 cup Heavy Whipping Cream Essential for creating the fluffy ghosts. You can also use whipped topping as a time-saver.
- 1 cup Crushed Oreos Provides the 'grave dirt'. Use gluten-free cookies as a substitute if needed.
- as needed optional Gummy Candies or Halloween Sprinkles For decoration.
Instructions
Preparation
- In a medium bowl, whisk together the chocolate pudding mix and milk until combined and thick. Chill in the fridge for about 5 minutes while you prepare the whipped cream.
- In a separate bowl, beat the heavy whipping cream until soft peaks form. Add a tablespoon of sugar if you prefer it sweeter and continue whipping until stiff peaks form.
Layering
- Start with a layer of chocolate pudding at the bottom of clear plastic cups or small mason jars.
- Add a layer of crushed Oreos to resemble grave dirt.
Creating the Ghosts
- Using a piping bag or spoon, top with whipped cream to create ghostly shapes.
- Finish off with a couple of chocolate chips as the eyes. Optionally, add gummy worms or edible eyes.
Final Chill and Serve
- Place the pudding cups back in the refrigerator for at least 30 minutes before serving to allow flavors to meld.

