
Nilla Wafer Cheesecake Bars: A Sweet Slice of Nostalgia
There’s something truly magical about the first time you unwrap a freshly baked Nilla Wafer Cheesecake Bar. I fondly recall the warmth of my kitchen that summer afternoon, the sun streaming through the window as I carefully layered the iconic vanilla wafers with silky cheesecake batter. The smell wafting through my tiny apartment reminded me of family gatherings and celebrations, when desserts became the centerpieces of laughter and shared memories. Each creamy bite of those Nilla Wafer Cheesecake Bars transported me back to simpler times—where dessert was not just a course but a celebration of connection. In those moments, I found joy not only in baking these treats but in sharing them with friends, igniting their own nostalgic cravings.
Flavor and Popularity
The Unique Flavor Profile of Nilla Wafer Cheesecake Bars
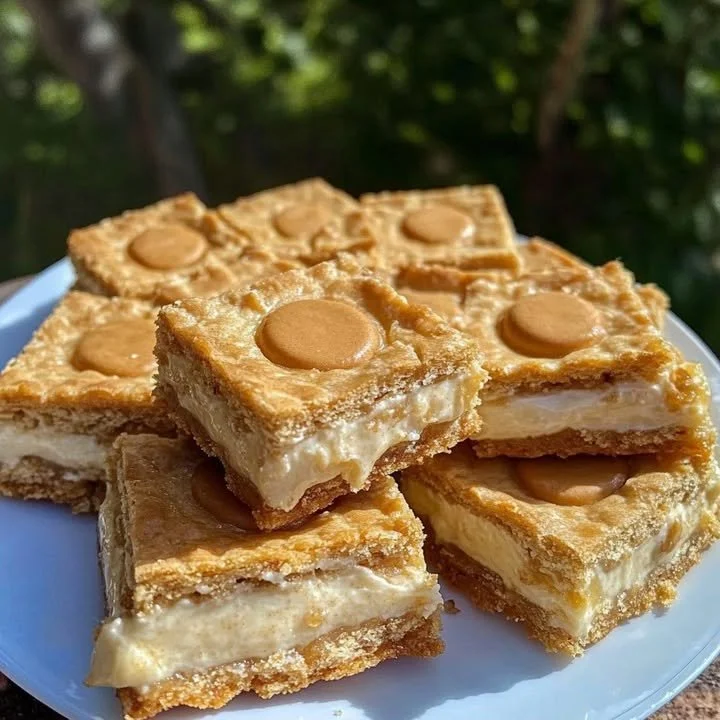
Nilla Wafer Cheesecake Bars present an exquisite balance of flavors and textures. The buttery crunch of the buttery Nilla wafers provides the perfect base, resembling the classic crust of a traditional cheesecake but with a playful twist. As you bite into one of these bars, the creamy cheesecake filling envelops your taste buds in smooth vanilla sweetness. Its richness is harmonized by the slightly tangy cream cheese, imbuing each square with a delightful layer of complexity.
What truly sets these bars apart is the slight crunch of the crust juxtaposed against the creamy filling, creating a texture that you can’t help but savor. The distinct flavor of vanilla, enhanced by the buttery notes of the wafers, evokes memories of picnics and celebrations, making these bars a beloved choice among both children and adults. Whether it’s at a summer BBQ or a cozy winter gathering, Nilla Wafer Cheesecake Bars shine as a dessert that sparks pure happiness.
Why This Recipe Is a Family Favorite and Crowd-Pleaser
What makes Nilla Wafer Cheesecake Bars a staple sweet treat in my home is their ability to be both reminiscent of childhood delights and adaptable to any occasion. Over the years, friends have raved about these bars, often requesting them for potlucks and family gatherings. Their simplicity makes them approachable, suitable for both novice bakers and seasoned pros.
The charm of this dessert lies in its nostalgic roots, calling back to family recipes passed down through generations, yet remaining modern in presentation and flavor. They are versatile enough to accommodate seasonal flavors—imagine adding fresh berries in summer or a hint of pumpkin spice in the fall, maintaining the essence while offering something new each time. It’s easy to see why they’re celebrated at birthdays, holidays, and everything in between; these bars showcase how dessert can tell a story, one delicious bite at a time.
Ingredients and Preparation
Essential Ingredients and Possible Substitutions
To recreate the magic of Nilla Wafer Cheesecake Bars, you’ll need a handful of simple, accessible ingredients. Here’s what you’ll need to gather:
| Ingredient | Quantity | Possible Substitutions |
|————————|—————-|———————————–|
| Nilla Wafers | 2 cups | Any vanilla wafer or graham cracker|
| Cream Cheese | 16 oz (softened)| Neufchâtel cheese or mascarpone |
| Granulated Sugar | ½ cup | Coconut sugar or honey |
| Sour Cream | 1 cup | Plain Greek yogurt |
| Vanilla Extract | 1 teaspoon | Almond extract or a scrape of vanilla bean|
| Eggs | 2 | Flax eggs for a vegan option |
With these ingredients on hand, you’re ready to create a dessert that feels both comforting and special.
Step-by-Step Recipe Instructions with Tips
Follow these simple steps to whip up your Nilla Wafer Cheesecake Bars:
- Preheat the Oven: Preheat your oven to 325°F (160°C). This ensures an even bake.
- Prepare the Pan: Line an 8×8-inch baking pan with parchment paper. This will make it easier to remove the bars once they’ve cooled.
- Crust Creation: In a mixing bowl, crush the Nilla Wafers until they resemble fine crumbs. Mix in melted butter and sugar until combined.
- Assemble the Crust: Press the mixture firmly into the bottom of the prepared pan to form an even layer. Bake for 10-12 minutes, until golden and fragrant.
- Cheesecake Filling: In another bowl, combine softened cream cheese, granulated sugar, and vanilla extract. Beat until smooth and creamy.
- Incorporate Eggs and Sour Cream: Add in the eggs one at a time, blending well after each addition. Finally, mix in the sour cream until the filling is uniform.
- Combine and Bake: Pour the filling over the crust, smoothing it with a spatula. Bake for 25-30 minutes or until the outside is set and the center has a slight jiggle.
- Cool and Chill: Allow the bars to cool in the pan at room temperature for an hour, then refrigerate for at least four hours for the best texture.
- Slicing and Serving: Use the parchment to lift the cheesecake from the pan. Slice into squares and enjoy!
Pro Tips:
- For a more fragrant crust, consider mixing in a tablespoon of ground cinnamon or nutmeg with the crumbs.
- Allow the bars to sit in the refrigerator overnight if possible; the flavors deepen over time.
Cooking Techniques and Tips
How to Cook Nilla Wafer Cheesecake Bars Perfectly
To ensure that your Nilla Wafer Cheesecake Bars turn out perfectly every time, focus on temperature control and baking time. Begin with room-temperature cream cheese and eggs; this contributes to a smoother filling. When baking, avoid overmixing the batter, as it can incorporate excess air that leads to cracks.
Additionally, the water bath technique can help achieve a creamy texture without cracks. To do this, place your baking pan into a larger pan filled with hot water. This creates gentle, even heat, helping the cheesecake cook uniformly.
Common Mistakes to Avoid
Even seasoned bakers can stumble with cheesecake. Avoid these common pitfalls:
- Overbaking: Remove the bars once the edges are firm, and the center still has a slight jiggle.
- Skipping the Chill: Refrigerate these bars for optimal texture. Cutting them too soon leads to messy squares.
- Not using Parchment: Always line your pan. It’s the easiest way to ensure clean removal.
Health Benefits and Serving Suggestions
Nutritional Value of Nilla Wafer Cheesecake Bars
While these dessert bars are indulgent, they also provide some valuable nutrients due to their ingredients. The cream cheese offers protein and calcium, while swapping out traditional sugar for honey or coconut sugar can make them slightly healthier. Enjoying Nilla Wafer Cheesecake Bars in moderation allows you to indulge while still being aware of your dietary choices.
Best Ways to Serve and Pair This Dish
Nilla Wafer Cheesecake Bars shine on their own, but there are countless ways to elevate your dessert experience.
- Pair with Fresh Fruit: Bright berries, sliced strawberries, or a poached pear can balance the richness perfectly.
- Add a Drizzle: A light lemon glaze or chocolate drizzle can add another flavor dimension.
- Serve with Coffee or Tea: These bars make for a perfect pairing with warm beverages, enhancing the overall experience.
FAQ Section
What type of mushrooms are best for Nilla Wafer Cheesecake Bars?
Mushrooms do not belong in Nilla Wafer Cheesecake Bars. This dessert is created specifically to highlight the creamy, sweet flavor of the cheesecake rather than savory ingredients.
Can I use dried garlic instead of fresh?
Similarly, garlic does not belong in these cheesecake bars. Stick to the sweet, comforting flavors of vanilla and cream cheese for the best results.
How do I store leftover Nilla Wafer Cheesecake Bars?
Store any leftovers in an airtight container in the refrigerator for up to five days.
Can I freeze Nilla Wafer Cheesecake Bars?
Absolutely! Wrap the bars tightly in plastic wrap and store them in a freezer-safe container for up to three months. Thaw in the refrigerator before serving.
Conclusion
If you’re like me and find comfort in homemade desserts, give these Nilla Wafer Cheesecake Bars a try. They’re not just a treat but a celebration of memories and love, igniting nostalgia with every bite. There’s something comforting about taking a moment to craft this simple yet delicious recipe. Trust me, you’ll want to make this again and again to share with friends and family. So, roll up your sleeves, pour your heart into the mixing bowl, and enjoy a slice of sweet nostalgia today. Happy baking!
