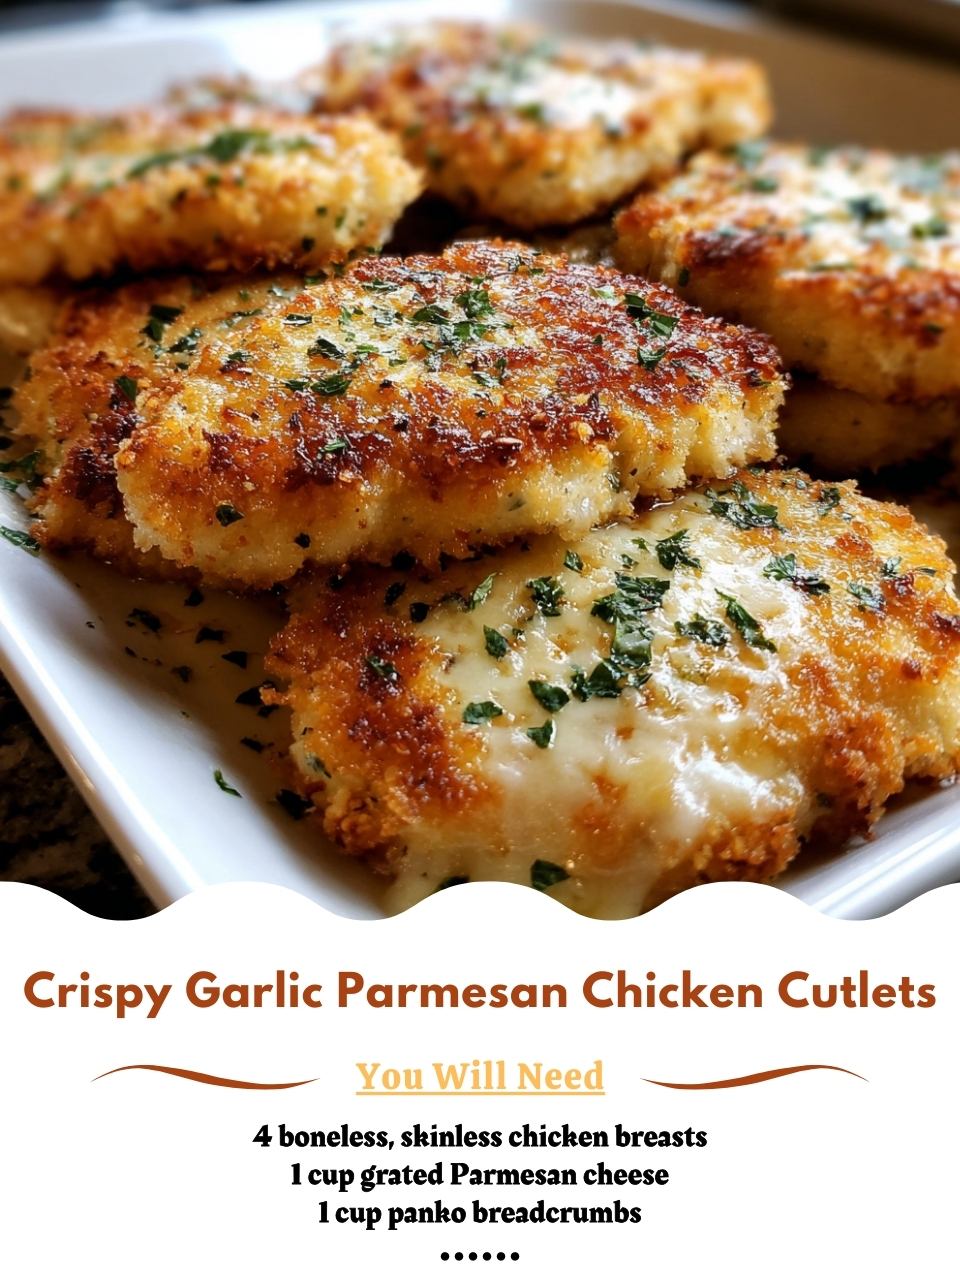
Crispy Garlic Parmesan Chicken Cutlets
I think we’ve all faced the “chicken breast dilemma”—how do you turn this lean, sometimes bland canvas into something truly crave-worthy? My answer for years has been these Crispy Garlic Parmesan Chicken Cutlets. The first time I made them, the smell of garlic toasting in the oven with nutty Parmesan was so intoxicating, my family gathered in the kitchen asking, “What is that?” The secret is in the magical, shatteringly crisp crust made from panko and cheese. That first bite, with its perfect crunch giving way to juicy, tender chicken, felt like a victory. It’s a recipe that never fails to deliver satisfaction and has earned a permanent spot in my weekly rotation.
Why You’ll Love This Recipe
You will love this recipe because it solves the dry, boring chicken problem forever. These cutlets deliver a restaurant-quality crunch and flavor with a simple, reliable method you can master on your first try. From my experience, the combination of savory garlic, salty Parmesan, and the incredible texture of panko breadcrumbs creates a crust so good you’ll want to eat it on its own. It’s a one-pan wonder that’s fancy enough for company and easy enough for a hectic Wednesday. Trust me, this is the chicken recipe you’ll come back to again and again.
Ingredients
- 4 boneless, skinless chicken breasts (about 6 oz each)
- 1 cup (100g) finely grated Parmesan cheese (use the good stuff from the deli section, not the green can)
- 1 cup (about 50g) panko breadcrumbs
- ½ cup (60g) all-purpose flour
- 2 large eggs
- 3 cloves garlic, minced
- 2 teaspoons dried Italian seasoning
- 1 teaspoon onion powder
- ½ teaspoon kosher salt
- ¼ teaspoon freshly ground black pepper
- ½ cup (1 stick) unsalted butter, melted
- Fresh parsley, chopped, for garnish (optional but recommended)
- Lemon wedges, for serving
Let’s talk ingredients, because a few key choices make all the difference. First, the Parmesan: you must grate it yourself from a wedge. Pre-grated cheese in a tub contains anti-caking agents like cellulose, which prevent it from melting and crisping properly. Freshly grated Parmesan will melt into the crust, creating flavorful, crispy bits. The panko breadcrumbs are non-negotiable—their large, flaky texture gives you that signature, airy crunch regular breadcrumbs can’t match. Mince the garlic finely so it distributes evenly in the butter. And using melted butter to toast the coating is the secret weapon; it browns beautifully and adds a rich, nutty flavor olive oil just can’t replicate.(See the next page below to continue…)
Equipment Needed
- Three shallow dishes (pie plates or wide bowls work perfectly)
- Baking sheet
- Parchment paper or aluminum foil
- Meat mallet, rolling pin, or heavy skillet (for pounding)
- Plastic wrap
- Whisk
- Pastry brush (optional, but helpful)
- Instant-read meat thermometer
Step-by-Step Instructions
First, I preheat my oven to 400°F (200°C) and line a large baking sheet with parchment paper. Then, I tackle the chicken. I place each breast between two sheets of plastic wrap and, using a meat mallet or the bottom of a heavy pan, I gently pound them to an even ½-inch thickness. This step is crucial—it ensures even cooking and creates the perfect “cutlet” shape. I pat them completely dry with paper towels; any moisture is the enemy of a crispy crust. While the oven heats, I melt the butter in a small saucepan or the microwave and stir in the minced garlic. The aroma is the official start of the cooking process.
Next, I set up my breading station, which I call my “assembly line of deliciousness.” In the first shallow dish, I mix the flour with the onion powder, salt, and pepper. In the second dish, I whisk the two eggs until smooth. In the third dish, I combine the panko breadcrumbs, the freshly grated Parmesan cheese, and the dried Italian seasoning, tossing with a fork until it’s uniformly mixed. I work with one cutlet at a time: I dredge it thoroughly in the flour, shake off the excess, dip it in the egg to coat completely, and then finally press it firmly into the panko-Parmesan mixture. I press hard to make sure every nook is covered with the cheesy crumbs.
I place each beautifully coated cutlet on the prepared baking sheet. Once all four are lined up, I take my garlic butter and, using a pastry brush or a spoon, I generously drizzle and brush it over the top of each cutlet. This buttery bath is what toasts the coating to a perfect golden brown and infuses it with garlic flavor. I used to skip this, thinking the butter would make it soggy, but I learned the opposite is true—it creates an irresistible, flavorful crunch. I bake the cutlets for 15-20 minutes. I never skip the thermometer; I pull them when the internal temperature reaches 165°F in the thickest part.(See the next page below to continue…)