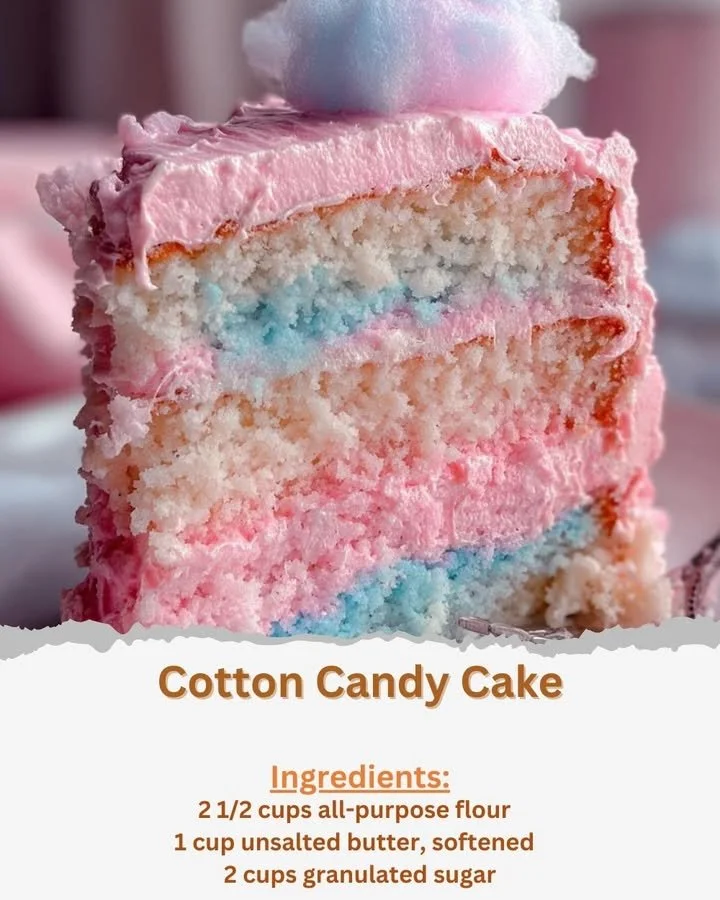
Cotton Candy Cake
Step-by-step instructions
Now, let’s get into the specifics of making your Cotton Candy Cake!
- Preheat your oven to 350°F (175°C). Prepare three 8-inch round cake pans by greasing and flouring them.
- In a medium bowl, whisk together the flour, baking powder, and salt. Set this mixture aside for later.
- In a large mixing bowl, beat the softened butter and sugar using an electric mixer on medium speed until it’s light and fluffy—this should take about 3-4 minutes.
- Add the eggs to the butter-sugar mixture, one at a time. Ensure each egg is fully incorporated before adding the next. Blend in the vanilla extract.
- Gradually alternative between adding the flour mixture and the whole milk to the butter mixture, starting and finishing with the flour, mixing until just combined.
- Divide the batter evenly into two bowls. Add a few drops of pink food coloring to one bowl and blue to the other, if desired.
- Pour the batters into the prepared pans in swirled layers or stripes for that fun cotton candy effect.
- Bake for 25-30 minutes or until a toothpick inserted into the center comes out clean.
- Let the cakes cool in the pans for 10 minutes before transferring them onto wire racks to cool completely.
- Once cooled, spread the cotton candy flavored syrup or whipped cream between the layers and over the top and sides of the cake.
- Just before serving, top with fresh fluffy cotton candy for that perfect sweet finish.
Best ways to enjoy it
This Cotton Candy Cake is a showstopper that can be served in delightful ways. Consider slicing it into generous portions and serving alongside a scoop of vanilla ice cream for an extra touch of indulgence. Pair it with a light, fruity beverage, such as lemonade or a sparkling berry drink, to balance out the sweetness. You could even create festive plates by garnishing the dessert with colorful sprinkles or edible glitter before serving!
Keeping leftovers fresh
To maintain the freshness of your Cotton Candy Cake, store any leftovers in an airtight container at room temperature for up to two days. If you need to keep the cake longer, refrigerate it for up to a week—but be mindful that the cotton candy topping may not hold up well. You can also freeze individual slices by wrapping them tightly in plastic wrap and then placing them in a freezer-safe container for up to three months. Just remember to defrost them in the fridge overnight when you’re ready to enjoy again!
Pro chef tips
Here are some helpful cooking tips to ensure your Cotton Candy Cake turns out amazing:
- Be sure to bring your butter and eggs to room temperature before mixing them. This helps create a smoother, creamier batter.
- Don’t overmix the batter after adding the flour and milk; this will keep your cake light and fluffy.
- If you want to avoid the food coloring mess, use colored batter swirls directly in the pans—this creates a lovely marbled effect without too much fuss.
Creative twists
Want to mix things up? Here are a few variations to try:
- Substitute the cotton candy flavor with other fun flavors, like bubblegum or strawberry.
- For a fruity twist, add some chopped strawberries or raspberries into the batter.
- Make it a themed cake by using colors relevant to a holiday or celebration; for instance, red and green for Christmas or orange and black for Halloween.
FAQs
How long does it take to make this cake?
From start to finish, this cake will take about 1.5 hours, including preparation, baking, and cooling time.
Can I use a different flavor besides cotton candy?
Absolutely! Feel free to use your favorite flavor syrup or even a traditional vanilla or chocolate frosting.
Is this cake suitable for freezing?
Yes, you can freeze the cake. Just make sure it is properly wrapped and stored in an airtight container to prevent freezer burn. It’s best enjoyed fresh, but freezing works for longer storage.
Creating this enchanting Cotton Candy Cake will not only satisfy your sweet tooth but also make you the star of any gathering. Give this recipe a try, and watch the smiles light up the faces of your family and friends!