
DQ Ice Cream Cake: The Ultimate Birthday Treat
I still remember the first time I encountered a DQ Ice Cream Cake: The Ultimate Birthday Treat, which felt like a rite of passage in our family. It was my younger sister’s birthday, and the celebration was buzzing with excitement. I was maybe eight years old, caught up in the whirlwind of colorful balloons, party hats, and that unmistakable sweet smell wafting from the kitchen. When my parents brought out the cake with its beautiful layers of creamy ice cream and fudgy filling, time seemed to stop. A chorus of "oohs" and "aahs" erupted from our guests, and I was mesmerized. Watching everyone dig in, their faces lighting up with joy as they tasted the creamy, crunchy layers for the first time, was magical. It felt like not just a dessert, but a moment of pure happiness, wrapped in all the sweetness of childhood. Little did I know, this experience would shape my love for food and celebrations, inspiring me to recreate that memory in my own kitchen every chance I got.
Flavor and Popularity
The Unique Flavor Profile of DQ Ice Cream Cake: The Ultimate Birthday Treat
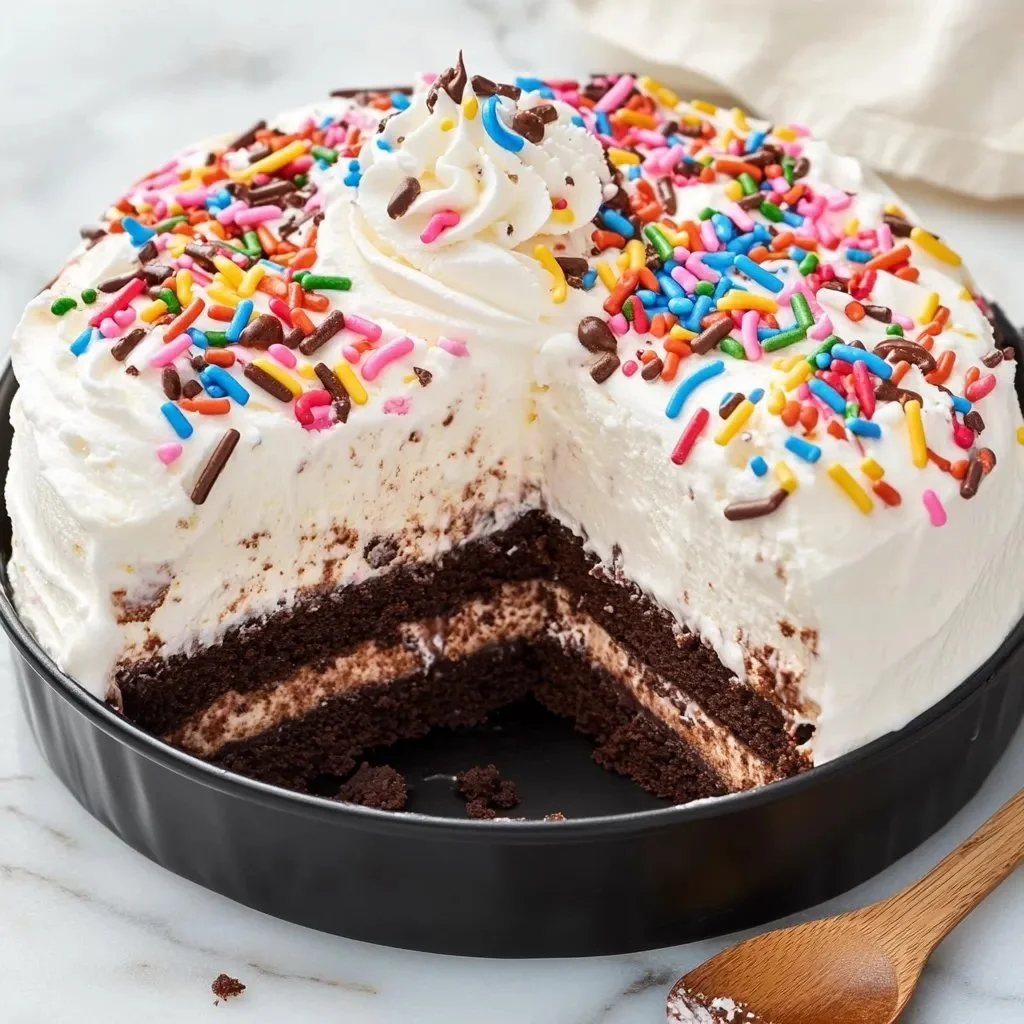
What makes a DQ Ice Cream Cake so unforgettable is the harmonious blend of flavors and textures. When you slice into this cake, the first thing that catches your attention is the creamy vanilla and chocolate ice cream layers. Each layer melds perfectly with the rich fudge and the crunchy cookie crumble that provides that delightful contrast we all crave. It’s not just a cake; it’s an experience that combines sweet nostalgia with the cold exhilaration of ice cream.
Each bite transcends the ordinary, offering a beautiful balance of flavors. The cake’s vanilla and chocolate ice cream layers work together seamlessly, creating a creaminess that feels almost ethereal. When you add that fudge center and the snap of the crunchy base, it’s clear that this is more than dessert; it’s a celebration captured in sweet layers. The popularity of the DQ Ice Cream Cake: The Ultimate Birthday Treat is no accident! It’s perfectly suited for summer birthday parties and cozy winter celebrations alike, because—let’s be honest—what time isn’t great for ice cream?
Why This Recipe Is a Family Favorite and Crowd-Pleaser
Anyone can serve a cake at a party, but there’s something about an ice cream cake that invites genuine excitement. It’s the ultimate crowd-pleaser; kids love it for its sweetness, while adults can’t resist its timeless charm. That joyful, “Wow!” erupting when the cake is unveiled is music to my ears. It’s a dessert that’s special enough to mark a significant occasion yet easy enough for anyone to enjoy. Over the years, it has cemented itself as a birthday staple in our family, and surely in many others.
Whenever we celebrate a birthday, there’s an unspoken certainty: the DQ Ice Cream Cake will be there, bringing a smile to every face at the table. Each celebration we host adds another layer of fond memories, filled with laughter and shared stories, making it not just a cake, but a part of our family’s narrative.
Ingredients and Preparation
Essential Ingredients and Possible Substitutions
Creating your own DQ Ice Cream Cake: The Ultimate Birthday Treat at home can seem daunting, but I promise it’s worth every moment of effort. Here’s what you’ll need:
- Ice Cream: Your choice of flavors—chocolate, vanilla, or even mint chocolate chip.
- Fudge Sauce: Store-bought or homemade for that indulgent layer.
- Chocolate Crust: Crushed chocolate cookies like Oreos form the perfect crunchy base.
- Whipped Topping: For that fluffy and creamy finish.
- Sprinkles: Because what is a birthday cake without a dash of fun?
If you want to switch things up, feel free to use fruit-flavored ice creams or gelatos for a refreshing twist. You can also opt for gluten-free cookies if you need a gluten-free option.
Step-by-Step Recipe Instructions with Tips
Prepare the Base: Crush the chocolate cookies in a ziplock bag until fine. Mix with melted butter and press into the bottom of a springform pan.
Layer the Ice Cream: Take your first flavor of ice cream out of the freezer to soften for about 10 minutes. Spread it evenly over the crust and put it back in the freezer to set.
Add Fudge Layer: Once the first layer hardens, pour your fudge sauce evenly over it, creating a luscious barrier.
Add Another Ice Cream Layer: Repeat the process with a second flavor of ice cream. Make sure to freeze between layers.
Finish with Whipped Topping: Once the top layer is set, spread the whipped topping over the entire cake and smooth it out.
Decorate: Use your creativity! Add sprinkles, chocolate shavings, or even fruit toppings before popping it back in the freezer for a final chill.
Serve: When ready, remove from the freezer a few minutes before serving to make slicing easier.
Tips for Success
- Use slightly softened ice cream for easier spreading and layering.
- If you want a firmer cake, let each layer freeze until solid before adding another.
- This cake can be made a day in advance, making it a perfect stress-free dessert option for parties.
Cooking Techniques and Tips
How to Cook DQ Ice Cream Cake: The Ultimate Birthday Treat Perfectly
The beauty of this cake lies in its simplicity, but a few techniques can elevate your experience. Make sure to pack the ice cream layers tightly to avoid air pockets. This not only ensures a sturdy structure but enhances the overall texture, creating a dessert that stands tall and proud, just like the memories tied to it.
Also, when decorating, consider using a piping bag for the whipped topping. This gives a professional finish and makes your cake even more stunning for those special moments when it’s unveiled.
Common Mistakes to Avoid
One common downfall is using ice cream that is too hard. If it’s straight from the freezer, softening it slightly is crucial to avoid tearing or crumbling the cake. Additionally, be careful not to overfill the pan—leaving some room to account for the expansion of ice cream will save you from a messy overflow in your freezer.
Health Benefits and Serving Suggestions
Nutritional Value of DQ Ice Cream Cake: The Ultimate Birthday Treat
Now, I will be real with you: while this cake isn’t winning any health awards, you can find a way to indulge wisely. Ice cream can contain calcium, vitamins, and some antioxidants from chocolate, especially dark chocolate. The joy it brings can’t be underestimated, either!
To make it a little lighter, opt for low-fat ice cream, and allow for smaller slices. Remember, this cake is about celebrating joy, not guilt.
Best Ways to Serve and Pair This Dish
Serve the DQ Ice Cream Cake chilled but not frozen rock solid. A fresh scoop of fruit sorbet on the side can offer a refreshing contrast. Pair it with fruit-forward cocktails or flavored sparkling water to cleanse the palate.
For even more fun, personalize each slice with decorative plates featuring everyone’s favorite toppings to create a mini dessert bar that guests can enjoy customizing.
FAQ Section
What type of mushrooms are best for DQ Ice Cream Cake: The Ultimate Birthday Treat?
Actually, there aren’t any mushrooms in this recipe—just delicious ice cream and cookie layers! Save the mushrooms for savory dishes.
Can I use dried garlic instead of fresh?
Dried garlic doesn’t belong in this cake. When it comes to ice cream cakes, stick with sweetness!
How do I store leftover DQ Ice Cream Cake: The Ultimate Birthday Treat?
Cover any leftovers with plastic wrap or foil and store them in the freezer. It’s best consumed within a week to retain its freshness.
Can I freeze DQ Ice Cream Cake: The Ultimate Birthday Treat?
Absolutely! This cake is meant to be kept in the freezer until you’re ready to serve it, but be sure to let it soften a few minutes before slicing for easier serving.
Conclusion
If you’re like me, you know that dessert isn’t just about sweetness—it’s about the stories and memories you create. The DQ Ice Cream Cake: The Ultimate Birthday Treat holds a special place in my heart, filled with family laughter and joy. Trust me, you’ll want to make this again and again, as it’s not just a delicious treat but a way to connect with loved ones and celebrate those little moments that mean so much. Roll up your sleeves, gather your family and friends, and let’s make some sweet memories together!
