
Candy Crafting 101 – Delicious Candies made at home!
Introduction
Who doesn’t love a sweet treat? Candy Crafting 101 is all about making simple and delightful candies right in your own kitchen! Whether you’re a seasoned cook or a beginner, this recipe is sure to bring joy and satisfy your sweet tooth. Gather your family and enjoy creating tasty candies together!
Why Make This Recipe
Making candy at home is not just fun, it’s also a great way to bond with your loved ones. You can customize the flavors and ingredients to suit everyone’s tastes. Plus, there’s something special about enjoying treats that you made with your own hands, making it a great option for parties, holidays, or just some weekend fun.
How to Make Candy Crafting 101
With just a few simple ingredients and steps, you’ll have a variety of delicious candies to enjoy. Let’s get started!
Ingredients
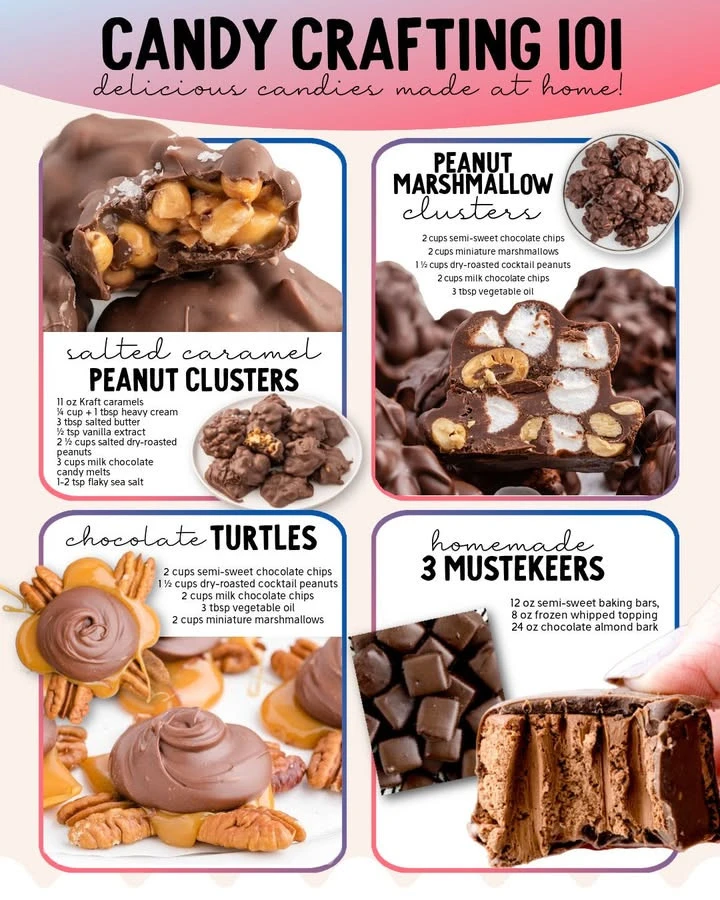
- 1 11-ounce bag of Kraft individually wrapped caramels, unwrapped
- 1/4 cup + 1 tablespoon heavy cream
- 3 tablespoons salted butter, sliced into pats
- 1/2 teaspoon pure vanilla extract
- 2 1/2 cups salted dry roasted peanuts
- 3 cups milk chocolate candy wafer melts
- 1-2 teaspoons flaky sea salt, for optional garnish
- 2 cups of semi-sweet chocolate chips
- 2 cups of milk chocolate chips
- 3 tablespoons of vegetable oil
- 2 cups of miniature marshmallows
- 1 1/2 cups of dry roasted cocktail peanuts
- 3 cups of whole pecan halves
- 2 tablespoons of heavy cream
- 12-ounce bag of milk chocolate chips
- 24 ounces of chocolate almond bark (also known as candy coating)
- 8-ounce tub of frozen whipped topping, thawed
Directions
Salted Peanut Caramel Clusters: Start by melting the caramels, heavy cream, and butter in a saucepan over low heat. Stir in the vanilla extract and salted dry roasted peanuts. Once mixed, drop spoonfuls onto a parchment-lined tray. Drizzle with melted chocolate and sprinkle with flaky sea salt.
Peanut Marshmallow Clusters: In another bowl, melt the semi-sweet and milk chocolate chips with vegetable oil. Stir in the miniature marshmallows and dry roasted cocktail peanuts. Drop spoonfuls onto parchment paper and let them set.
Chocolate Turtles: Arrange clusters of whole pecans on a tray. Pour melted caramel (mixed with heavy cream) over each cluster. Drizzle with melted chocolate and sprinkle with sea salt.
Homemade 3 Musketeers Bars: Melt the semi-sweet baking bars in a bowl and mix in the thawed whipped topping until smooth. Pour this mixture into a lined pan and let it set. Once firm, cover with melted chocolate almond bark and cool before slicing.
How to Serve Candy Crafting 101
These yummy candies are perfect for sharing! Serve them on a platter at your next gathering, or keep them in a cute jar to offer as a sweet treat. They are great for parties, movie nights, or just as a delightful snack.
How to Store Candy Crafting 101
Store your candies in an airtight container at room temperature. They will last for about a week or two, depending on the type of candy. If you want to keep them longer, you can freeze them, but be sure to separate layers with parchment paper.
Tips to Make Candy Crafting 101
- Always melt chocolate slowly to prevent it from burning.
- Feel free to mix in other nuts or dried fruits based on your preference!
- Use silicone molds for fun shapes if you want to get creative!
Variation
You can swap out ingredients based on what you have at home. For instance, use dark chocolate instead of milk chocolate, or replace peanuts with your favorite nuts or candies. The possibilities are endless!
FAQs
Can I use other types of chocolate?
Yes! You can use dark, white, or any type of chocolate you like.What if I don’t have heavy cream?
You can substitute with milk, but the texture might be slightly different.Can I make these candies ahead of time?
Absolutely! They store well, so you can make them a few days in advance before the occasion.
Enjoy making these tasty treats together with friends and family, and have a blast in the kitchen! Happy candy crafting! 🍬✨
